Quick Start: How to Create a Roku Channel in 15 Minutes

The following steps will guide you through the process of building a Roku "Custom SDK" channel. Sample video content and poster image URLs are provided, but feel free to substitute URLs for your own videos and posters if you wish.

Prerequisites:
  1. An Instant TV Channel account.
  2. A Roku Developer Account at http://developer.roku.com.
  3. A Roku device connected to a TV set or computer monitor, or a TV set with a built-in Roku device.

Step-by-Step Directions:

  1. Log into your Instant TV Channel account.
  2. From the menu along the left side of the page, select Channels.

    If this is a new account, you will already have a brand new Basic channel waiting to be filled with content.

    If you want to start fresh, click the New Channel button at the bottom of the channel list. At the top of the page, select a Basic Customizable Channel Template, then click the Confirm button.

    If you are creating a new SDK channel for importing a Direct Publisher feed, select the Grid Customizable Channel Template, as this will provide a starting point that is most similar to the old Direct Publisher layout.

    If you already have a Direct Publisher channel in your Instant TV Channel account, and are migrating the channel to SDK, then skip down to the section on generating a new Pkg file.

    If you are watching a video for this walk-through, it may incorrectly show the Classic channel type. Use the Basic Customizable Channel Template instead.

    Your new Roku channel is at the bottom of your channel list, and should be highlighted in yellow.

  3. From the menu along the left side of the page, select Theme.

    This is the Theme Editor. It allows you to change the look and feel of your Roku channel. For now, we'll just be changing the title. In the top parameter box, change "My Channel" to the name you want your new channel to have, for example "My Quick Channel".

  4. From the menu along the left side of the page, select Content.

    This is the Content Editor. It allows you to change the details of individual video or audio content items. It also lets you add new content items, and move, copy, or delete existing content items.

    Notice the Content Editor Help shown in the window along the right side of the page. This window often contains useful information about how to use the current page.

    The content "tree" shown in the upper left window is a visual representation of your Roku channel's layout. Each list and content item is shown here. Clicking any item causes the details of that item to be shown in the lower detail window, and any poster artwork associated with the item is shown in the upper right poster window. Clicking the + symbol next to a list, series , grid , or grid-row expands it to show the content item(s) it contains.

    There is only one content item currently in the channel . Let's change some of the information for that content item.

    1. In the parameter box labeled Title, replace "New Video or Audio" with "Plan 9 From Outer Space".
    2. In the parameter box labeled Description, replace the default text with "Worst Movie Ever Made!"
    3. In the parameter box labeled PosterURL, replace the default URL with

      http://ex.irchan.com/plan9/detail_hd.png

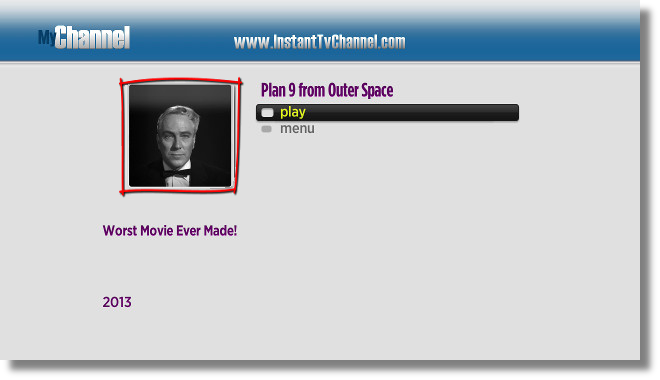
      The PosterURL points to the image (stored on a web server, S3 bucket, or other image storage service) that will be displayed in the content item's detail screen, after it has been selected on the Roku device. The detail screen is often referred to as the Springboard screen in Roku's SDK documentation.


    Example "PosterUrl" poster on a "Springboard" screen.

    1. Scroll the parameter list down to the Stream 1 URL parameter box that contains the default "https://cdn2.instanttvchannel.com/plan9/plan9_640x480.mp4" URL. This long URL points to the video content stream (stored on a web server, content delivery network, or online video provider) that will be played when this item is selected on the Roku device.
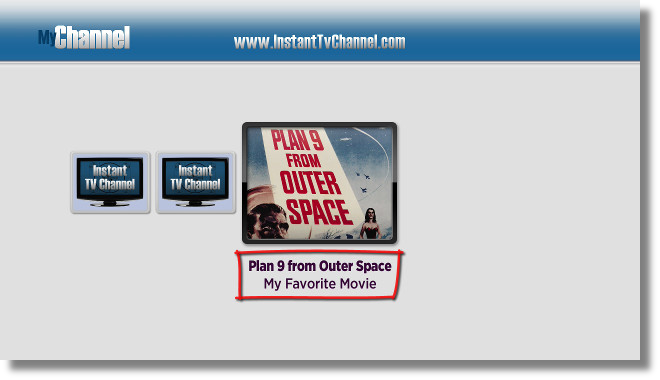
    2. Scroll further down to the parameter box labeled ShortDescriptionLine2, and change "Created with www.InstantTvChannel.com" to "My Favorite Movie".

      The ShortDescriptionLine1 and ShortDescriptionLine2 parameters contain the text that is displayed below the poster for the content item at the top level or parent-list of your channel, before the content item is selected on the Roku device.


    Example "Short Description Line 1" & "Short Description Line 2" on a "Horizontal List" screen.

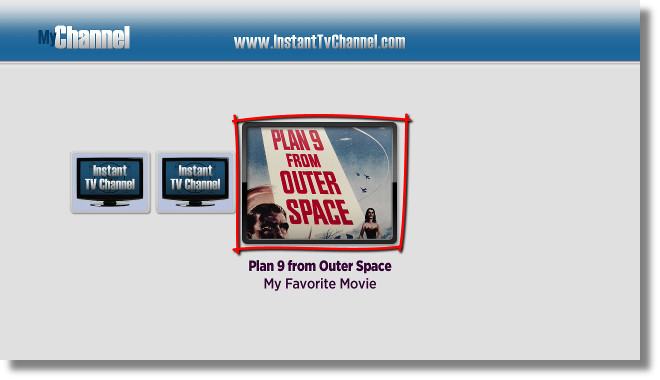
    1. Scroll the parameter list down a little bit more to ListPosterURL, and change the default URL to

      http://ex.irchan.com/plan9/list_hd.png

      The ListPosterURL points to the image (stored on a web server, S3 bucket, or other image storage service) that will be displayed for the content item at the top level or parent-list of your Roku channel, before the content item is selected on the device.


    Example "ListPosterUrl" posters (3 shown, 1 highlighted) on a "Horizontal List" screen.

    We have been using image URLs that point to specifically-sized .png files for each image that the content item might display. Using images that are sized to the exact requirements of the Roku device allows the channel to load faster. It is possible to use images of other sizes at the cost of slower load times. The recommended image size is always shown in the description next to the image URL parameters in the Content Editor. PNG, JPG and GIF images are supported.

  5. Now we're ready to package your Roku channel.

    From the menu along the left side of the page, select Channels.

    Click on the row containing the channel to be packaged.

    In the same row as the new channel there is a Package button with a red box around it.

    1. Click the Package button in the channel's row.
    2. Click the Confirm Pkg button.
    3. After the channel has been packaged, a DOWNLOAD PKG link is displayed. Click on the DOWNLOAD PKG link and save the file somewhere on your computer. You will need to upload it to your Roku Developer Account in a later step.

    The Pkg file contains the Brightscript and SceneGraph code that will be loaded from Roku's servers onto any Roku device - player or TV set - that installs your channel.

  6. Before uploading the channel Pkg file to your Roku Developer Account, you'll need to have the Channel Store poster. This is the artwork that is displayed in the Channel Store to represent your channel. The size of the Channel Store poster is exactly 540 pixels wide and 405 pixels high.

    Use the following link to download a sample Channel Store poster from Instant TV Channel and save it to your computer:

    http://ex.irchan.com/samples/channel-store-fhd-b-540x405.jpg
  7. Now we will upload the Pkg file for your new channel to your Roku Developer Account.

    1. Log into your Roku Account at https://developer.roku.com

    1. If you are not yet signed up to be a developer, you'll be asked to complete some enrollment information. After you've completed the enrollment forms, return to the "Roku Publishing Platform" page and click the Dashboard link to advance to the "Dashboard" page.


    Roku Publishing Platform page - Click the "Dashboard" link.

    1. On the left side of the Dashboard page, click the My Channels link to advance to the "Manage Channels" page.


    Dashboard page - Click "My Channels".

    1. Near the top of the Manage Channels page, click the Add Channel button.


    Manage Channels page - Click the "Add Channel" button.

    If you are migrating a Direct Publisher channel to SDK, do not click Add Channel, instead click the Options link to the right of your existing channel name, and select Convert to SDK Channel.

    You will still need to review each of the steps below! Some information will be pre-populated from the Direct Publisher channel, and some will not. You must verify all information, and provide any missing information before the SDK version of the channel can be published.


    Manage Channels page - Direct Publisher Only - Select "Convert to SDK Channel".

    1. If you are migrating a Direct Publisher channel this step is skipped. Your channel is already configured as a Public SDK channel.

      Select No for the "beta channel" option. This will create a Public channel.

      Enter your channel's name into the Channel Name text box.

      Click the Save or Continue button to advance to the "Properties" page.


    Add Channel page - Select the "Developer SDK" & "No", and enter your channel's name.
    This page may appear different since Roku removed Direct Publisher options.

    1. On the "Properties" page, select the Channel Store Regions for which you have the rights to distribute your channel's content. If your content has no regional licensing restrictions, it is OK to select all of the Regions.


    Properties page - Select the regions in which your channel can be viewed.

    1. Select Yes or No for the "Is your channel made for kids?" option. If selecting Yes you must follow any child privacy and protection laws in the countries in which your channel is published. For most channels, the correct choice is No.


    Properties page - Is your channel made for kids?

    1. Select Yes or No for the "CVAA" option. If selecting Yes you must provide accessibility features, like closed-captions or subtitles, in your channel. For most channels, the correct choice is No.


    Properties page - Is your channel CVAA compliant?

    1. Enter the URL for your privacy policy. If you don't have a privacy policy URL yet, it's OK to temporarily use the URL for Instant TV Channel's privacy policy.


    Properties page - Enter your Privacy Policy URL.

    1. Enter a Vanity Access Code. This is usually a few words, with no spaces, that identify your channel. Write down this code, you'll need it to install the channel later on.


    Properties page - Enter a "Vanity Access Code".

    1. For most channels, the remaining settings on the "Properties" page should remain unchanged.

      Click the Save or Continue button at the bottom of the page to advance to the "Channel Store Info" page, or click the navigation list at the top of the page and select "Channel Store Info".


    Properties page - Select Continue or Save.
        

    or... Navigation List - Select Channel Store Info.

    1. On the "Channel Store Info" page, provide a Description and a Web Description.


    2. Channel Store Info page - Enter a description for your channel.


      Channel Store Info page - Enter a web description for your channel.

    3. Click Add a poster and then locate and select the previously saved sample Channel Store poster. If you are using your own poster instead of the sample, the poster must be exactly 540 pixels wide and 405 pixels high.


    Channel Store Info page - Upload a Channel Store Poster.


    Channel Store Info page - Channel Store Poster uploaded.

    1. Select a "Descriptive Category" for your channel. This is the on-screen Channel Store category in which your channel will appear, after it has been submitted and approved as a public channel.


    Channel Store Info page - Select a Preferred Category.

    1. Select a "Domestic Region" for your channel. When your channel is submitted and approved as a public channel, this is the geographic region in which the channel will appear under the Descriptive Category. The channel will appear in the "International" category in all other geographic regions that were selected on the "Properties" page.

    Channel Store Info page - Select a Domestic Region.

    1. Click the Save or Continue button at the bottom of the page to advance to the "Monetization" page, or click the navigation list at the top of the page and select "Monetization".


    Channel Store Info page - Select Continue or Save.
        

    or... Navigation List - Select Monetization.

    If your Roku Developer Account is not enrolled in Roku Billing Services then the "Monetization" page may not be available, and you should select "Screenshots" instead, and skip to step 18 below.
    1. For this example channel you should leave "None of the above apply" selected.

      Then click the Save or Continue button to advance to the "Screenshots" page, or click the navigation list at the top of the page and select "Screenshots".


    Monetization page - No monetization selected.
        

    or... Navigation List - Select Screenshots.

    1. Screenshots are optional. Instant TV Channel does not provide ZIP files, which prevents screenshots from being generated using the "side-loading" process. Instead, you can use the following equipment to generate screenshots. This equipment also allows you to make MP4 copies of the video content of a channel. You'll need both items, the splitter sits between the Roku device and the Elgato:

      https://amazon.com/dp/B01DRWCOGA
      https://amazon.com/dp/B005HXFARS

      Click the Save or Continue button to advance to the "Support Information" page, or click the navigation list at the top of the page and select "Support Information".


    Screenshots page - Select Continue or Save.
        

    or... Navigation List - Select Support Information.

    1. Enter your contact information into the Support Information page. If you don't have a "Preferred URL for more information" yet, it's OK to temporarily use the URL for Instant TV Channel.

      Click the Save or Continue button to advance to the "Package Upload" page, or click the navigation list at the top of the page and select "Package Upload".


    Support Information page - Select Continue or Save.
        

    or... Navigation List - Select Package Upload.

    1. If this is the first time that you've uploaded a Package file to your Roku Developer Account, you'll be asked to verify your email address.

      Click the "Send verification email" button to send a verification message to the email address associated with your Roku account. You must reply to the verification message before continuing.


    Package Upload page - Send Verification Email.

    1. After replying to the verification email, click the "Refresh" button, then click the "Continue" button, or click the navigation list at the top of the page and select "Package Upload".


    Package Upload page - Refresh.


    Package Upload page - Email Address Verified.

    ...or Navigation List - Select Package Upload.

    1. Usually you will not see the page below and you can skip to step 23 below. However, if there is no Roku device or no payment method associated with your Roku Developer Account, then Roku will require that you configure a device and a payment method before continuing. (Roku requires this to make it more difficult for bots to submit channels.)

      After setting up a device or payment method, you can return to the "Package Upload" page by clicking the navigation list at the top of any page and selecting "Package Upload".


    Package Upload page - Link Device or Add Payment Method. (Usually you will not see this page.)


    Navigation List - Select Package Upload.

    1. On the "Package Upload" page, change the Minimum Firmware to "v10.0.0 b1". Usually this will never need to be adjusted again. If Minimum Firmware is set too high, your channel will not be available on older model Roku devices.

      In the future, if you need to upload a new Pkg file, you must remember to always increment the Channel Version number shown above the Minimum Firmware setting. Channel Version is what all Roku devices use to determine whether or not a newer Pkg file containing an updated version of your channel is available. If Channel Version is not incremented when you upload a new Pkg file, then Roku devices that already have your channel installed will not be able to receive the updated version. If the channel has not yet been published, then Channel Version remains at "1.0" and cannot be changed.

      Click Upload a package and then locate and select the previously saved Pkg file.

      After your package has been uploaded, Check the I'm not a robot box, then click the Save or Continue button to advance to the "Preview and Publish" page.


    Package Upload page - Upload a Pkg file.


    Package Upload page - Select Save or Continue.

    1. Your new channel exists in your Roku developer account, but in order to view it, the channel also needs to be added to your Roku user account.

      On the "Preview and Publish" page, click on the Access Code link to begin to add the pre-publication version of the channel to your Roku user account. Your Access Code will be different from the one shown below.

      The Access Code can be used to install your Roku channel into any account, not just your own.

      Because the channel is unpublished and is not yet public, the version installed using the Access Code will expire after 120 days and can be installed by no more than 20 users.


    Preview and Publish page - Click the "Access Code" link.

    1. Click through any warning or confirmation screens until you reach a screen similar to the one below, indicating that the channel has been added:


    User Account page - Channel added successfully.

  8. Your new channel is now in your Roku account and will usually be installed onto your Roku device within a few minutes. To force your Roku device to install your channel immediately you may need to do a System Update. Using your Roku remote control:

    1. Press the remote control HOME key.
    2. Use the remote control UP and DOWN keys and the OK key to select Settings from the on-screen menu.
    3. Select System from the on-screen menu.
    4. Select System update from the on-screen menu.
    5. Select Check now from the on-screen menu.
    6. You should see a brief message flash on the screen about installing your new channel.
    7. Press the remote control HOME key again.

    If your new channel installed successfully, it will be located directly above the dividing line in your Roku home-screen channel list.

    Selecting your channel will bring up a splash screen first, then it will display the ListPosterURL image. Your channel currently has only a single ListPoster image, although most channels will have several.

    Click OK with your remote to select the ListPoster image. You'll see the Springboard screen for your content item.

    Select the on-screen Play button to start the content item stream, "Plan 9 From Outer Space".

  9. Most changes to your Roku channel can be made instantly, without re-packaging or re-uploading to your Roku Developer Account.

    For example, let's add a new video content item to the channel:

    1. From the Instant TV Channel menu along the left side of the page, click Content to go to the Content Editor page.
    2. Right click on the channel folder icon in the upper left window and select New Video or Audio from the list of items. A content item named "New Video or Audio" is added to your Roku channel.
    3. Again, right click on the channel folder icon to create another content item.
    4. The two new content items have the default URLs for the Instant TV Channel posters and the default "Plan 9 From Outer Space" stream URL. Later on you can come back and change these to something else, but for now we'll keep the defaults.
    5. Go back to your Roku device. Press the Home button on your Roku remote control to exit your channel, then press OK to restart your channel. (You'll always need to exit and then re-enter your channel before viewing any new or recently changed content.)
    6. The two new content items that you added appear in your Roku channel.

    ANY item on the Content page can be changed WITHOUT needing to re-package or re-upload the channel to your Roku Developer Account, and the changes will appear INSTANTLY in the on-screen channel.

    Changing items on the Theme page with a Pkg checkbox will require re-packaging and re-uploading to Roku. If your Roku channel needs to be repackaged and re-uploaded then a red box will appear around the Package button in the main Channel List.

  10. At this point you should complete your channel by replacing the sample videos with your own videos, and perhaps re-arrange it into a multi-row Grid instead of as a single Horizontal List.

    For a more sophisticated appearance you may want to consider including grids and trailers in your channel. Here is some additional information to get you started:

STOP!!! You can now view your channel on a TV screen. But before proceeding, you must complete the design of your channel, load it with content, and then thoroughly test it, to make sure that it both looks and operates correctly.

After you have completed the design of your channel, and thoroughly tested it to make sure that is looks and operates correctly, return to this point in the walk-through in order to publish your channel into the on-screen Roku Channel Store. Channels published into the on-screen Roku Channel Store are Public channels that can be installed by an unlimited number of users.

  1. Log into your Instant TV Channel account and select the channel to be published.
    1. Select Content from the menu along the left side of the page.

    2. Select a typical content item currently in the channel.

    3. Copy the 36-character "Content UID" shown directly beneath the item's poster. This will be used in a later step.


    ITVC Content page - The Content UID will be used as the Deep-Linking ID.

  1. Log into your Roku Developer Account and navigate back to the "Preview and Publish" page for your channel.
    1. On the "Preview and Publish" page, examine the Publishing Checklist.

      • Items with a purple checkmark are complete.
      • Items marked with a red exclamation symbol contain errors that must be corrected before the channel can be published publicly.
      • Items marked with a yellow exclamation symbol contain warnings that will not prevent the channel from being published publicly, but which the developer should be aware of.
      • Items with a light-grey (almost invisible) checkmark may or may not be complete.

      If you've been following the walk-through above, the Deep Linking item in the checklist will have a red exclamation symbol next to it.

      Click the Deep Linking line to jump directly to the "Deep Linking" page.


    Preview and Publish page - Click "Deep Linking" in the Checklist.

    1. Deep-Linking is used when advertising specific video items within a channel. Deep-Linking allows a video item within a channel to be played automatically, without the using the remote-control. Even if you do not intend to use Deep-Linking with your channel, the deep-linking information that you provide will be used by the required "Channel Behavior Analysis" tests at a later step in this walk-through. Please see the Deep-Linking help article for more information.

      On the "Deep Linking" page, select a Media Type that matches the content item that you selected previously.

      • movie - A long-form film or movie.
      • shortFormVideo - An standalone content item of 15 minutes or less.
      • live - A live stream. Note: Roku does not require Deep Linking support for live streams unless the channel consists entirely of one or more live streams.
      • episode, season, or series - An episode belonging to a set of related TV shows.
      • special - A content item that is not any of the above Media Types.


    Deep Linking page - Select a Media Type.

    1. Paste the 36-character Content UID that was copied above into the Content ID box.

      Enter the content item's title into the Content Title box.

      Click the Add button to save the content parameters.


    Deep Linking page - Add the Content Parameters.

    1. Click the Save button at the bottom of the page to save the Deep Linking parameters.


    Deep Linking page - Save the Content Parameters.

    1. Click the navigation list at the top of the page and select "Preview and Publish".


    Navigation List - Select Preview and Publish.

    1. If the Deep Linking information was saved correctly, the red exclamation symbol should no longer be present.

      Click the Static Analysis line to jump directly to the "Static Analysis" page.


    Preview and Publish page - Click "Static Analysis" in the Checklist.

    1. Static Analysis performs tests by examining the code in the Pkg file without executing the code. Choices that you made on the Instant TV Channel "Theme" page may affect the results shown on the "Static Analysis" page.

      On the "Static Analysis" page, click the Analyze button to begin the Static Analysis testing, then periodically click the Refresh button to update the results.


    Static Analysis page - Click the "Analyze" button to begin testing.
        

    Static Analysis page - Click the "Refresh" button to update the results.

    1. Ideally, when the Static Analysis results are displayed, there will be no error or warnings shown. Any errors will prevent the channel from being published. Warnings will not prevent the channel from being published, but should be corrected if possible.

      For example, the warnings below indicate that the monetization selections from step 17 above did not include monetization with either ads ("RAF usage") or in-channel purchases ("Billing usage"). The 3rd line is informational only and can be safely ignored.


    Static Analysis page - Two warnings.

    1. If no warnings are present, skip ahead to the Channel Behavior Analysis section below by clicking on the navigation list at the top of the page and selecting "Channel Behavior Analysis".


    Navigation List - Select Channel Behavior Analysis.

    1. To remove the warnings, re-visit the "Theme" page in your Instant TV Channel account and change both IncludeBilling and IncludeRAF to "False". This will remove the Brightscript code related to ads and billing that caused the Static Analysis warnings.

      Notice the checked Pkg checkbox next to each of the two parameters. This indicates that a new Pkg file will be required if the parameter is changed.

      After changing the two parameters, generate and download a new Pkg file.


    ITVC Theme page - Set IncludeBilling and IncludeRAF to "False".

    1. In your Roku Developer Account, click the navigation list at the top of the page and select "Package Upload".


    Navigation List - Select Package Upload.

    1. On the "Package Upload" page, upload the new Pkg file as described in step 23 above.

      After uploading the new Pkg file, click the navigation list at the top of the page and select "Static Analysis".


    Navigation List - Select Static Analysis.

    1. On the "Static Analysis" page, re-run the Static Analysis test as described in step 7 above.

      After re-running the test, the two warning messages should no longer be present.

      Click the navigation list at the top of the page and select "Preview and Publish".


    Navigation List - Select Preview and Publish.

    1. On the "Preview and Publish" page, examine the Publishing Checklist.

      There will usually be a purple checkmark next to the Static Analysis line after successfully running the Static Analysis test. If the purple checkmark is not present, that's OK, as long as there is no red exclamation point.

      Click the Channel Behavior Analysis line to jump directly to the "Channel Behavior Analysis" page.


    Preview and Publish page - Click "Channel Behavior Analysis" in the Checklist.

    1. Channel Behavior Analysis runs various tests on your Roku channel. Each test must pass in order for the channel to be published.

      Several of the tests will use the Deep Linking information that you previously entered to exercise the channel. If the Deep Linking Content ID entered in step 3 above does not match a playable video, the tests will fail.

      Click the Run Channel Behavior Analysis button to begin the tests.


    Channel Behavior Analysis page - Click the "Run Channel Behavior Analysis" button.

    1. The tests will be performed one at a time, and may run for several minutes each.

      As the tests progress, each test's status will change from "Queued", to "Running", to "Verifying", then finally to either "Pass" or "Fail".

      The tests shown below may not exactly match the tests that Roku currently performs.


    Channel Behavior Analysis page - Tests running...

    1. All tests must complete with a status of "Pass" before continuing.

      Often one or more of the tests will fail for no apparent reason. If this occurs, upload the same Pkg file again, and then rerun the tests.

      If both the "Channel Launch Performance" test and the "Channel Deep Linking Basic" test consistently fail, it may indicate that the Deep Linking information provided in step 2 above is invalid.

      If you have run the "Channel Behavior Analysis" test several times without passing all tests, please email a screenshot of the test results to for assistance.

      Shortcut The "Static Analysis" tests are run automatically when performing the "Channel Behavior Analysis" tests. If you are not explicitly running the "Static Analysis" tests, be sure to check the "Static Analysis" results after running the "Channel Behavior Analysis" tests.


    Channel Behavior Analysis page - Passed!

    1. Click the navigation list at the top of the page and select "Preview and Publish".


    Navigation List - Select Preview and Publish

    1. On the "Preview and Publish" page, examine the Publishing Checklist.

      • There should be no red exclamation symbols present.
      • There must be a purple checkmark next to the "Channel Behavior Analysis" line.
      • Some lines may have a light-grey (almost invisible) checkmark , this does not necessarily indicate a problem.

    2. Click the Schedule Publishing button at the bottom of the page to submit the channel to Roku for approval as a Public channel.

      If the Schedule Publishing button is greyed out or is not clickable, it indicates that either a test has failed, or that a required information item was not provided. Roku might not provide a specific error message when an information item is missing, so if the Schedule Publishing is greyed out or is not clickable it may be necessary to review each page for missing items. The best pages to start with will be any that do not have a purple checkmark in the Publishing Checklist.


    Preview and Publish page - Schedule the channel for publication.

    1. After clicking the first Schedule Publishing button, the channel's publication date will be displayed.

      Click the second Schedule Publishing button to accept this date.


    Preview and Publish page - Schedule the channel for publication (again).

    1. Enter "This is a new channel" into the Release Notes box.

      Check both checkboxes.

      Click the Save button to submit the channel for approval and publication.


    Preview and Publish page - Submit the channel for publication.

    1. A "Congratulations" page is displayed which reminds you that any changes made in your Roku Developer Account for this channel will cancel the submission.

      You can still make any changes in your Instant TV Channel account that do not require a new Pkg file. For example you can add or delete videos, or make any other changes on the Instant TV Channel "Content" page without cancelling or affecting the submission date.

      Click the OK button.


    Preview and Publish page - Congratulations!

    1. Near the bottom of the "Preview and Publish" page, verify that the channel status is "Scheduled For Publishing".

      If possible, take a screenshot of the "Preview and Publish" page for your own records. The screenshot might be needed later if any problems arise.


    Preview and Publish page - Verify Status.

    1. You should immediately receive a confirmation email from Roku indicating that your channel submission has been received.

      On the scheduled publication date, you should receive another email from Roku indicating that your channel has been published into the on-screen Roku Channel Store.


Email comments & questions about this Roku developer guide to .

If you have a Commercial channel type, you can call Instant TV Channel at 717-441-4386 for assistance.