BIF, or "Base Index Frames", is an archive file format that
contains a set of still images,
also known as "trick play thumbnails",
supporting enhanced fast-forward and
rewind modes during video playback on Roku devices.
"Commercial" apps can
use the built-in BIF file creator
to generate a BIF file for a video,
automatically store the BIF file in an S3 bucket,
and write the BIF file's URL into the video's HDBifUrl parameter.
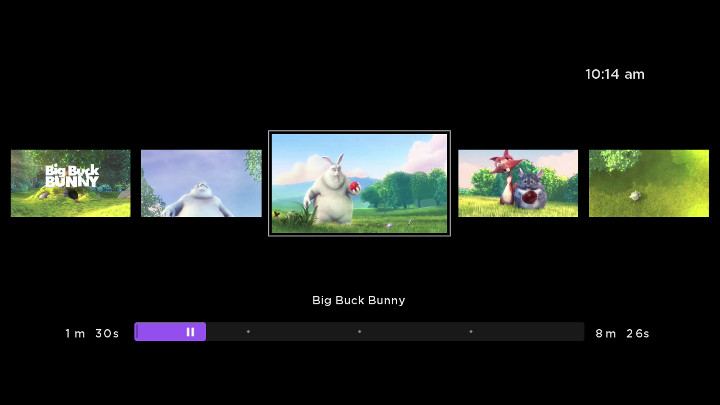
When a BIF file is provided for a video,
a timeline of screenshots is provided when fast-forwarding or rewinding through the video:
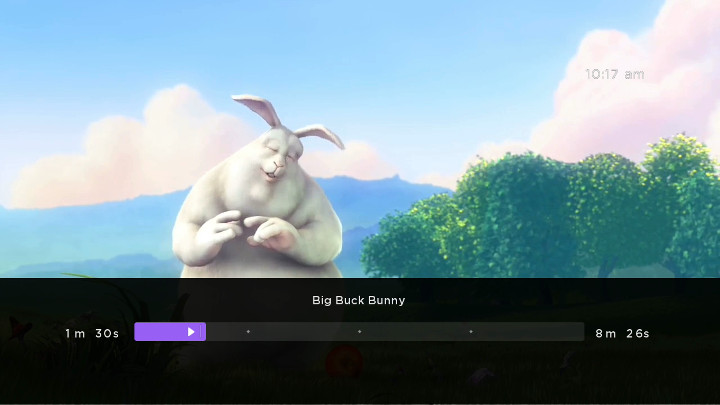
Without a BIF file, the current frame of video is frozen on-screen when fast-forwarding or rewinding:
How to add BIF to COMMERCIAL apps:
BIF files can be added to your Roku app several different ways:
Using BIF-generation software to create the BIF file.
The BIF file must be uploaded to a web server or hosting service.
The URL for the BIF file must be manually entered into the video's HDBifUrl parameter.
Using Instant TV Channel to create the BIF file.
The BIF file is emailed to you, which you must then upload to a web server or hosting service.
The URL for the BIF file must be manually entered into the video's HDBifUrl parameter.
Using Instant TV Channel to create the BIF file.
Instant TV Channel stores the BIF file in a pre-configured S3 bucket, and automatically populates the HDBifUrl parameter.
Reasons for choosing one method or another are:
BIF files stored in and served from an AWS S3 bucket may cost more than using a web server or other hosting service.
The built-in Instant TV Channel BIF creator is only available for "Commercial" app types.
Create the BIF Bucket
Log into your AWS account and go to the S3 section of your AWS control panel.
Click the Create Bucket button.
This should be a new bucket that is used only for BIF files.
Provide a Bucket Name, for example "my-bif-bucket".
Very Important: Use only lower-case characters, digits, and dashes in your bucket name.
Instant TV Channel does not support the use of upper-case characters or other symbols in bucket names.
Good Bucket Name: bif-bucket
Good Bucket Name: bif123
Bad Bucket Name: bif.bucket(contains unsupported period character ".")
Bad Bucket Name: bif+123(contains unsupported plus character "+")
Bad Bucket Name: BIF-Bucket(contains upper-case characters)
The bucket Region must be set to "US East (N. Virginia)".
Click the Create button, do not click the Next button.
The default ACL (Access Control List) on your new bucket is "Private",
meaning that an AWS key is required to access files in the bucket.
The bucket cannot be accessed using a plain http:// or https:// URL.
This is usually the correct setting for a BIF bucket
as it only allows the Instant TV Channel web site and your app
running in a Roku device to access the BIF files.
Create IAM Keys to Access the BIF Bucket
We will create two sets of keys to grant access to your BIF bucket.
One set of keys will grant read-write access to the bucket and will be used by
the Instant TV Channel web site to write new BIF files into your S3 BIF bucket.
The other set of keys will grant read-only access to the BIF bucket and
will be used to load BIF files directly into any Roku device that has your app installed.
Because the Roku device does not need to alter the contents of the BIF bucket or BIF files,
its keys can be read-only.
The use of read-only keys is optional,
if not present then any Roku device with your app installed will use the read-write keys.
Go to the IAM (Identity and Access Management) section of your AWS control panel.
Click the Policies link on the left side of the page.
Click the Create policy button near the top of the page.
Click the JSON tab, and erase the sample lines of JSON text.
Copy the security policy below and paste it into the JSON text box.
Replace the two instances of
my-bif-bucket
in the policy
with the name of the bucket that you just created.
This security policy allows files in the BIF bucket to be created, read, modified, or deleted.
Click the Next: Tags button near the bottom of the page.
Click the Next: Review button near the bottom of the page.
Provide a new Policy Name, for example "my-rw-bif-policy" ("rw" stands for read-write).
You may optionally also enter a Policy Description.
Click the Create policy button near the bottom of the page.
Click the User groups link on the left side of the page.
Click the Create group button near the top of the page.
Provide a new User group name, for example "my-rw-bif-group".
Scroll down to the list of policies, and locate the "my-rw-bif-policy" policy that you just created,
or type the name of your newly created policy in the "Filter" box.
You may need to scroll through a large number of built-in AWS policies until your policy is visible.
Check the checkbox to the left of your policy name.
making sure that no other checkboxes are checked,
then click the Create Group button near the bottom of the page.
Click the Users link on the left side of the page.
Click the Add Users button near the top of the page.
Provide a new User name,
for example "my-rw-bif-user".
Click the Next button near the bottom of the page.
Check the checkbox to the left of the previously created Group name,
then click the Next button near the bottom of the page.
Click the Create user button near the bottom of the page.
Click the previously created User name from the list of users.
This will display a Summary page for the user.
Click the Security credentials link or tab.
Click either of the Create access key buttons.
Select Other,
then click the Next button.
Click the Create access key button.
Click the Show link beneath "Secret access key" or
click the Download .csv button to copy and save the Access Key ID and Secret Access Key.
These keys will be used exclusively for read-write access to your BIF bucket.
They cannot be used to access any other AWS buckets or services.
Make sure that you save the keys for future use,
Amazon will not display them again.
If you misplace the keys you will have to create a new IAM user.
After copying the Security Credentials, click the Close button near the bottom of the page.
At this point we have a new IAM user that is a member of a new IAM group -
the user has the keys and the group has the security policy.
The keys for this IAM user can be used in the Roku app to access the BIF bucket specified by the security policy.
Repeat each of the steps above,
beginning with Go to the IAM (Identity and Access Management) section...
to create a read-only IAM group, policy, user and keys.
This time use the security policy below for the Policy Document box,
replacing the two instances of
my-bif-bucket
in the code below
with the name of the bucket that you previously created.
This security policy allows files in the BIF bucket to be read, but not created, modified, or deleted.
The same BIF bucket and keys can be used for other apps.
It is not necessary to create a new bucket and keys for each app.
You can use the BIF Bucket Prefix parameter on the Services page to organize the BIF files for each app into separate folders within the bucket.
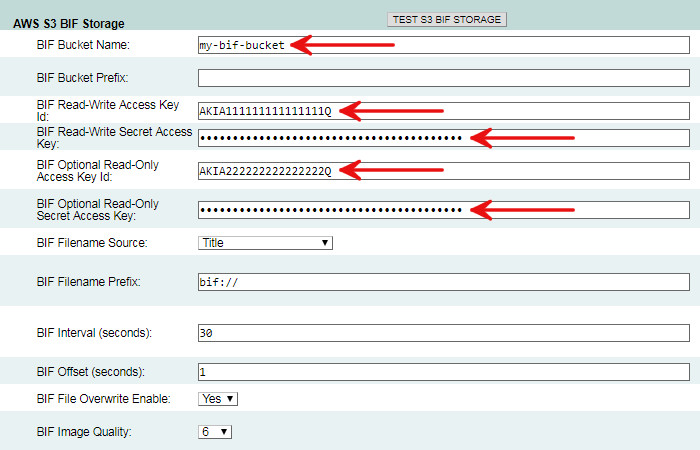
Copy the BIF Bucket Name & Keys to your App
Sign into Instant TV Channel and select the app
that you want to configure for BIF.
Go to the app's Services page.
Under AWS S3 BIF Storage,
copy the new BIF bucket name into the BIF Bucket Name box.
Copy the read-write IAM user's Access Key ID into the BIF Read-Write Access Key ID box.
Copy the read-write IAM user's Secret Access Key into the BIF Read-Write Secret Access Key box.
Copy the read-only IAM user's Access Key ID into the BIF Optional Read-Write Access Key ID box.
Copy the read-only IAM user's Secret Access Key into the BIF Optional Read-Write Secret Access Key box.
Click the TEST S3 BIF STORAGE button and verify that
the S3 BIF bucket Read-Write and Read-Only tests OK message is displayed.
If the test fails, verify that your S3 keys were copied correctly and try again.
Review and Optionally Adjust Other BIF Parameters
The BIF Bucket Prefix parameter can be used with a value such as "my-app/" to store the BIF files for this app in a separate folder within the bucket.
The BIF file name is usually created from the Title of the video.
Change the BIF Filename Source parameter to use a different source for the BIF file name.
Available sources are:
Title
DeepLinkId
Stream 1 URL
ShortDescriptionLine1
ShortDescriptionLine2
Content UID
The BIF Filename Prefix must be "bif://" in order to use the secure BIF bucket keys.
When using BIF files in a Direct Publisher app the secure keys cannot be used,
and it is necessary that all BIF files have public URLs.
This can be accomplished by changing the BIF Filename Prefix to a public prefix such as
http://bucketname.s3.amazonaws.com/
along with configuring a public access policy for the BIF bucket.
If you are not using an S3 bucket to host your BIF files,
the BIF Filename Prefix parameter can be set the URL of your BIF web server or hosting service,
for example http://my.webserver.com/roku/bifs/
The BIF Interval, the length of time between each BIF image, can be increased or decreased.
The allowable range is from 5 seconds to 60 seconds.
Smaller BIF Interval values will result in larger BIF file sizes and higher bandwidth costs.
In general, apps containing mostly short-form video content should have a smaller BIF Interval value,
and apps containing mostly long-form video content can safely have a larger BIF Interval value.
The BIF Offset should usually remain at 1.
Increasing this value will shift the BIF images relative to the corresponding positions in the video.
In order to overwrite already-existing BIF images stored in the BIF bucket,
it is necessary to change BIF File Overwrite Enable to "Yes".
Leave BIF File Overwrite Enable at "No" to prevent existing BIF files from being accidentally overwritten.
Increasing the BIF Image Quality from the default value of 6 will improve the sharpness of the BIF images,
at the expense of a larger BIF file size and bandwidth cost.
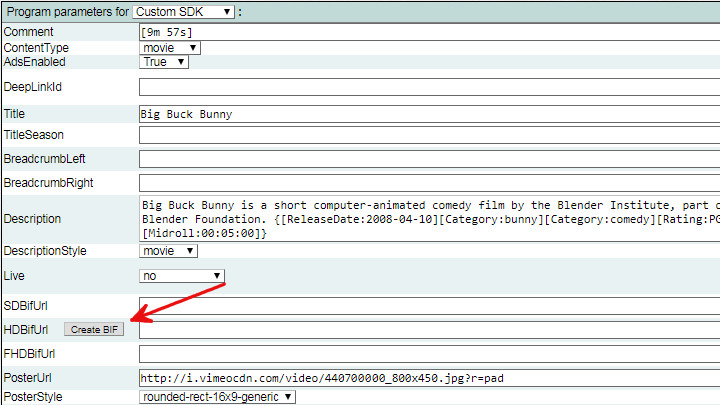
Create BIF Files
To request a BIF file for any video in your app:
Click the Create BIF button next to the HDBifUrl parameter on the video item's Content page.
BIF files can be created from MP4, MKV, non-live HLS, and Vimeo video stream URLs.
Other stream URL formats are not yet supported.
The SDBifUrl and FHDBifUrl parameters are not required at this time.
It may take several hours for your BIF file to be generated.
It's OK to leave the Content page or edit a different content item,
your BIF file request will still be processed.
Your video's HDBifUrl parameter will be automatically filled-in after the BIF file has been created,
and will be visible when you return to this content item.
You can refresh the content item by clicking on the item's icon in the content tree.
Erasing the HDBifUrl "BIF file has been requested" message while the request is being processed may prevent the BIF URL from being written into the HDBifUrl parameter,
however this will not prevent the BIF file from being created and stored into the S3 bucket or emailed to you.
If you are storing your BIF files into an S3 bucket,
a brief email report will be optionally sent to you after each BIF file is successfully stored,
if enabled on the "Account" page.
A separate email is sent for each BIF file.
If you are not storing your BIF files into an S3 bucket, each BIF file will be sent to you as an email attachment.
After receiving the BIF file you will need to upload it to your hosting service.
Don't forget to check that the automatically-generated HDBifURL works correctly with your hosting service.
It can be adjusted using the BIF Filename Prefix parameter on the Services page.
Using a CDN with S3 for BIF Files
For Roku apps with higher traffic volumes,
it is usually more cost-effective to serve BIF files from a CDN than from an S3 bucket.
When using a CDN,
the BIF files can be stored in an S3 bucket,
and the CDN uses the S3 bucket as its origin server.
This provides the following advantages:
It allows the CDN to deliver the BIF files to Roku devices viewing your app, instead of S3 delivering the BIF files,
which should significantly lower the S3 bandwidth cost.
It allows Instant TV Channel to automatically write the BIF files into the origin server (the S3 bucket),
which saves time compared to manually copying the BIF files into the origin server.
To configure Instant TV Channel to use a CDN to serve BIF files:
Follow the steps above to set up an S3 bucket to store your BIF files.
Configure your CDN to use the S3 bucket in which your BIF files are stored as the "origin server".
Exactly how this is done will vary from CDN to CDN.
Contact for assistance.
On the Services page enter your CDN distribution's base URL into the BIF Filename Prefix parameter.
The URL should have a trailing "/".
If the previous steps have been followed correctly,
newly generated BIF files will be automatically stored in the designated S3 bucket,
and each video item will have its HDBifUrl parameter automatically populated with a URL that points at the CDN distribution's copy of the BIF file.
For example, if the BIF Bucket Prefix parameter is set to "mymovie/bif/" and the BIF Filename Prefix parameter is set to "http://cdn.mycompany.com/",
then:
Each BIF file that is created will be automatically stored in the S3 bucket in the "mymovie/bif/" subdirectory.
Each video item will have its HDBifUrl parameter automatically populated with a URL like "http://cdn.mycompany.com/mymovie/bif/123456.bif".
How to create BIF files for FREE and UNLIMITED apps:
In the BIF Video File Creator you'll need to generate a single BIF file for each video item.
Use either the "320x240 HD 4:3" or the "320x180 HD 16:9" setting depending on the aspect ratio of the video item.
After you have your BIF file,
you'll need to store it on S3,
on your CDN,
or on your web server in order to have a URL to use in Instant TV Channel.
From the Instant TV Channel Content Editor,
put the URL for your BIF file into the HDBifUrl parameter.
The SDBifUrl and FHDBifUrl parameters are not used at this time.
Instant TV Channel is a cloud-based tool for Roku developers and content providers that shortens development time and eases maintenance after deployment.

 icon in the content tree.